ViewPager的使用
ViewPager简介
- 它是Android 3.0后引入的一个UI控件(视图滑动切换工具)
- 通过手势滑动可以完成View的切换,一般是用来做APP的引导页或者实现图片轮播。
ViewPager的使用要点
- ViewPager是v4包中的一个类,继承自ViewGroup,是一个容器,可以在其中添加其他的view类。
- ViewPager布局管理器允许翻转带数据的页面,可以通过实现PagerAdapter来显示视图。
- ViewPager类需要一个PagerAdapter适配器类给它提供数据。
PagerAdapter的介绍
适配器就像显示器,是把复杂的数据按人们易于接受的方式来展示。
PagerAdapter也是android.support.v4包中的类。
PagerAdapter主要是对ViewPager进行数据适配,以实现ViewPager控件的滑动效果。
PagerAdapter的使用(继承PagerAdapter类)
- getCount()// 显示多少个页面
- isViewFromObject(View, Object)//判断返回的view是否是来自Object
- instantiateItem(ViewGroup, int)// 初始化指定位置的页面
- destroyItem(ViewGroup, int, Object) // 销毁指定位置的页面
案例1:APP启动页的开发
- 在主布局文件中添加ViewPager控件
- 隐藏工程导航栏
- 新建三个布局页面,用来作为启动页面。
- 编写Adapter类,为ViewPager控件创建一个适配器。
- 编程实现启动页面的滑动功能
Fragment的使用
Fragment简介
Android在3.0版本引入了 Fragment(碎片) 功能,它非常类似于Activity,可以像Activity一样包含布局。
它出现的初衷是为了适应大屏幕的平板电脑,使用Fragment我们可以把屏幕划分成几块,合理利用屏幕空间。
Fragment 通常是嵌套在 Activity 中使用。
现在想象这种场景:有两个Fragment,Fragment 1包含了一个ListView,每行显示一本新闻的标题。Fragment 2包含了TextView和自定义View,来显示新闻的标题和详细内容。
程序运行竖屏模式的平板或手机上,Fragment 1可能嵌入在一个Activity中,而Fragment 2可能嵌入在另一个Activity中,如下图:
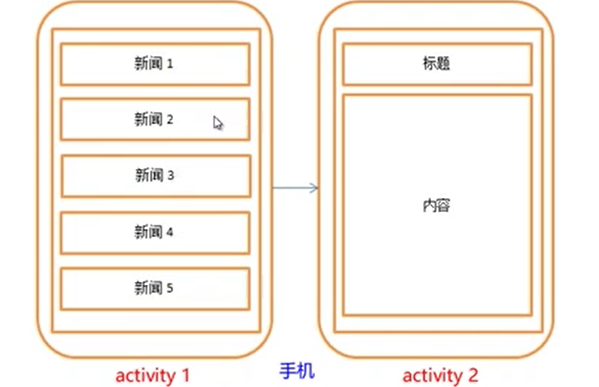
程序运行在横屏模式的平板上,两个 Fragment 就可以嵌入在同一个 Activity 中,如下图:
Fragment使用要点
- Fragment并不能单独使用,他需要嵌套在Activity 中使用,作为Activity界面的一部分组成出现。
- 可以在一个Activity中同时出现多个Fragment,并且一个Fragment也可在多个Activity中使用;
- 在Activity运行过程中,可以通过transaction的add()、remove()、replace()方法来添加、移除或者替换Fragment;
- Fragment可以响应自己的输入事件,并且有自己的生命周期,但它的生命周期受其宿主Activity的生命周期影响。比如Activity 被destory销毁了,它也会跟着被销毁。
- 3.0之前的系统,需要先导入android-support-v4的jar包
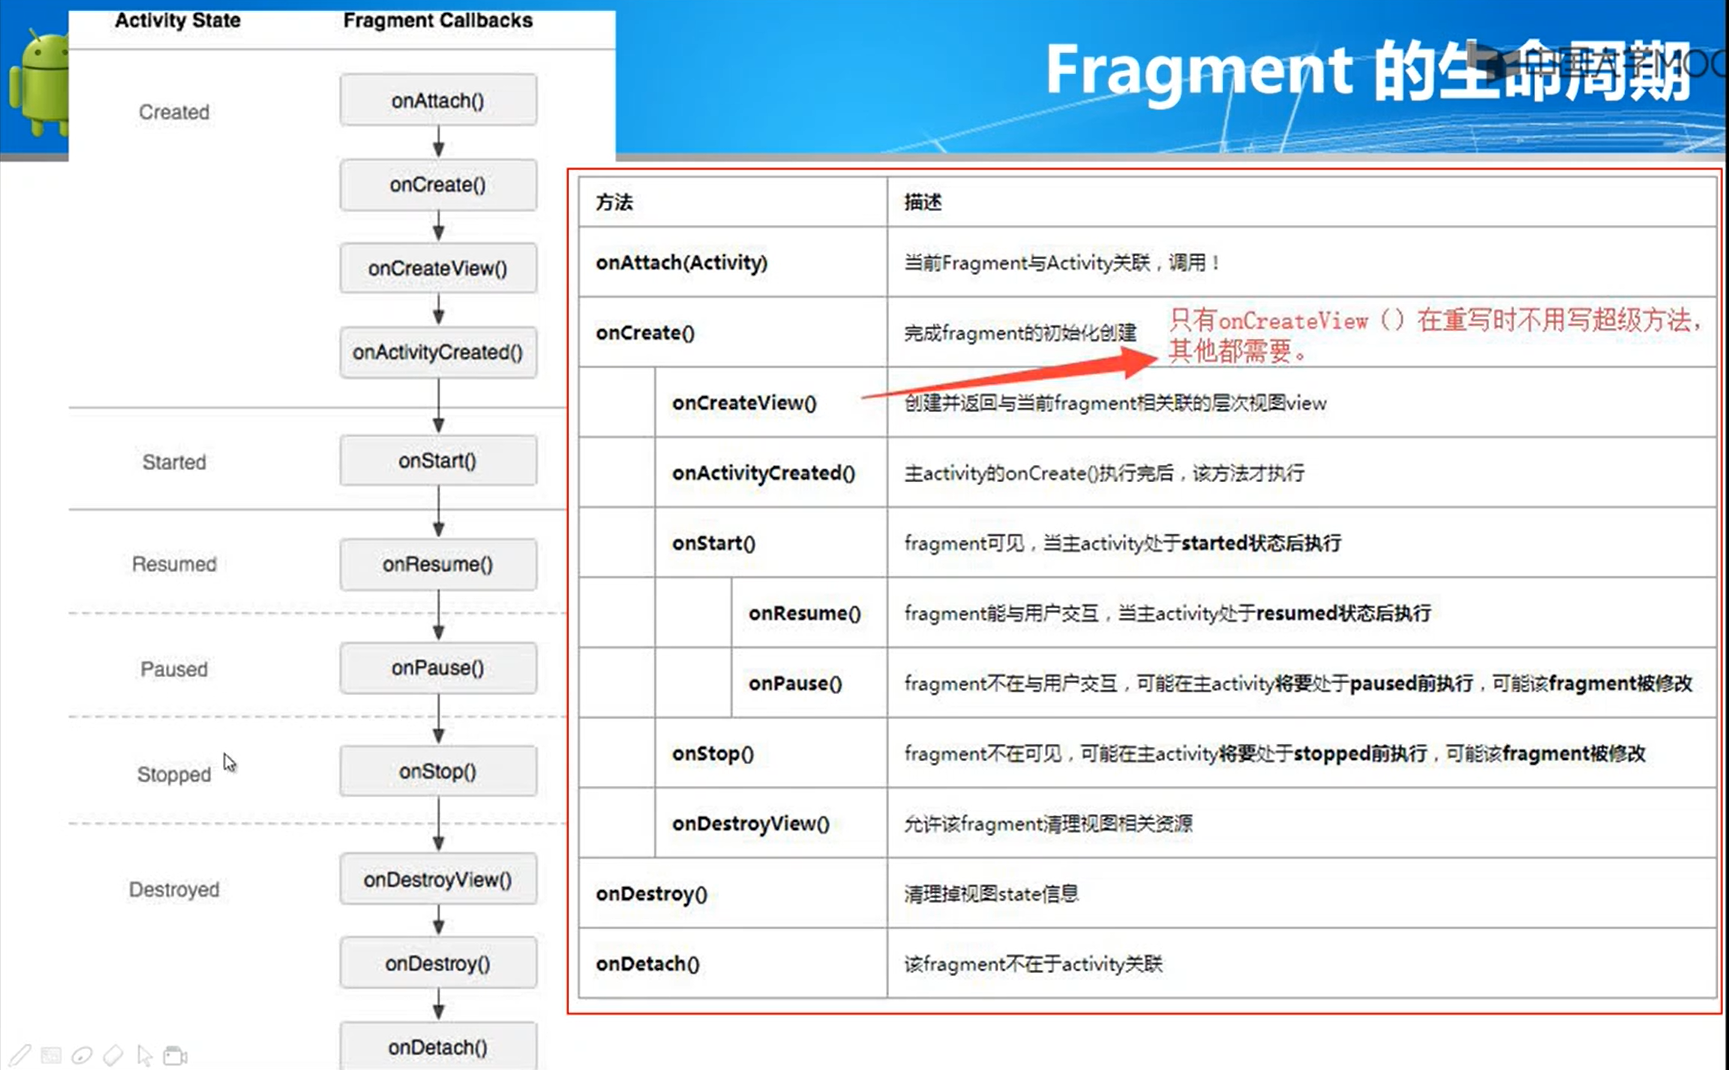
Fragment 的生命周期
案例2:APP底部导航功能开发
在主布局文件中加入Fragment替换区,底部导航区,分割线等。
1
2
3
4
5
6
7
8
9
10
11
12
13
14
15
16
17
18
19
20
21
22
23
24
25
26
27
28
29
30
31
32
33
34
35
36
37
38
39
40
41
42
43
44
45
46
47
48
49
50
51
52
53
54
55
56
57
58
59
60
61
62
63
64
65
66
67
68
69
70
71
<androidx.constraintlayout.widget.ConstraintLayout xmlns:android="http://schemas.android.com/apk/res/android"
xmlns:app="http://schemas.android.com/apk/res-auto"
xmlns:tools="http://schemas.android.com/tools"
android:layout_width="match_parent"
android:layout_height="match_parent"
tools:context=".FragmentActivity">
<RelativeLayout
android:layout_width="match_parent"
android:layout_height="match_parent">
<LinearLayout
android:id="@+id/content_layout"
android:layout_width="match_parent"
android:layout_height="match_parent"
android:layout_above="@id/view_line_1"
android:orientation="vertical">
</LinearLayout>
<View
android:id="@+id/view_line_1"
android:layout_width="match_parent"
android:layout_height="1dp"
android:layout_above="@id/Bottom_tap"
android:layout_alignParentBottom="false"
android:background="#4A1A1A" />
<LinearLayout
android:id="@+id/Bottom_tap"
android:layout_width="match_parent"
android:layout_height="50dp"
android:layout_alignParentBottom="true"
android:orientation="horizontal">
<ImageView
android:id="@+id/iv_home"
android:layout_width="wrap_content"
android:layout_height="wrap_content"
android:layout_weight="1"
android:src="@mipmap/home" />
<View
android:id="@+id/view_line_2"
android:layout_width="1dp"
android:layout_height="match_parent"
android:background="#231313" />
<ImageView
android:id="@+id/iv_letter"
android:layout_width="wrap_content"
android:layout_height="wrap_content"
android:layout_weight="1"
android:src="@mipmap/letter" />
<View
android:id="@+id/view_line_3"
android:layout_width="1dp"
android:layout_height="match_parent"
android:background="#231313" />
<ImageView
android:id="@+id/iv_my"
android:layout_width="wrap_content"
android:layout_height="wrap_content"
android:layout_weight="1"
android:src="@mipmap/my" />
</LinearLayout>
</RelativeLayout>
</androidx.constraintlayout.widget.ConstraintLayout>新建三个简单的布局文件,作为Fragment的View对象,并分别进行标识。
每个文件代码格式如下:
1
2
3
4
5
6
7
8
9
10
11
12
13
14
15
16
17
18
19
20
21
22
23
package com.example.timeemail.Fragments;
import android.os.Bundle;
import android.view.LayoutInflater;
import android.view.View;
import android.view.ViewGroup;
import androidx.annotation.NonNull;
import androidx.annotation.Nullable;
import androidx.fragment.app.Fragment;
import com.example.timeemail.R;
public class Fragment_home extends Fragment {
public View onCreateView(@NonNull LayoutInflater inflater, @Nullable ViewGroup container, @Nullable Bundle savedInstanceState) {
//创建Fragment布局
View view = inflater.inflate(R.layout.layout_home, container, false);
return view;
}
}在MainActivity.java里编写逻辑代码,实现UI及底部标签切换。
开启事务transaction,以实现底部导航功能。
1
2
3
4
5
6
7
8
9
10
11
12
13
14
15
16
17
18
19
20
21
22
23
24
25
26
27
28
29
30
31
32
33
34
35
36
37
38
39
40
41
42
43
44
45
46
47
48
49
50
51
52
53
54
55
56
57
58
59
60
61
62
63
64
65
66
67
68
69
70
71
72
73
74
75
76
77
78
79
80
81
82
83
84
85
86
87
88
89
90
91
92
93
94
95
96
97
98
99
100
101
102
103
104
105
106
107
108
109
110
111
112
113
114
115
116
117
118
119
120
121
122
123
124
125
126
127
128
129
130
131
132
133
134
135
136
137
138
139
140
141
142
143
144
145
146
147
148
149
150
151
152
153
package com.example.timeemail;
import androidx.appcompat.app.AppCompatActivity;
import androidx.fragment.app.Fragment;
import androidx.fragment.app.FragmentTransaction;
import android.graphics.Color;
import android.os.Bundle;
import android.view.View;
import android.widget.ImageView;
import com.example.timeemail.Fragments.Fragment_home;
import com.example.timeemail.Fragments.Fragment_letter;
import com.example.timeemail.Fragments.Fragment_my;
public class FragmentActivity extends AppCompatActivity implements View.OnClickListener {
private Fragment fragment_home, fragment_letter, fragment_my, nowFragment;
private ImageView iv_home, iv_letter, iv_my;
protected void onCreate(Bundle savedInstanceState) {
super.onCreate(savedInstanceState);
setContentView(R.layout.activity_fragment);
initUI();
}
/**
* 初始化ui界面
*
* @param
*/
private void initUI() {
iv_my = (ImageView) findViewById(R.id.iv_my);
iv_home = (ImageView) findViewById(R.id.iv_home);
iv_letter = (ImageView) findViewById(R.id.iv_letter);
// //设置底部tab变化,默认第一个被选中
// iv_home.setBackgroundColor(Color.DKGRAY);
// iv_letter.setBackgroundColor(Color.WHITE);
// iv_my.setBackgroundColor(Color.WHITE);
show_Fragment_home();
//为底部标签添加点击事件
iv_my.setOnClickListener(this);
iv_home.setOnClickListener(this);
iv_letter.setOnClickListener(this);
}
//第一个标签被点击
private void show_Fragment_home() {
//开启事务,Fragment的切换是由事务控制的
FragmentTransaction transaction = getSupportFragmentManager().beginTransaction();
//判断Fragment是否为空
if (fragment_home == null) {
fragment_home = new Fragment_home();
//添加Fragment到事务中
transaction.add(R.id.content_layout, fragment_home);
}
//隐藏所有的Fragment
hideAllFragment(transaction);
//显示Fragment
transaction.show(fragment_home);
//记录当前显示的Fragmnet
nowFragment = fragment_home;
//提交事务
transaction.commit();
//设置底部标签的变化
iv_home.setBackgroundColor(Color.DKGRAY);
iv_letter.setBackgroundColor(Color.WHITE);
iv_my.setBackgroundColor(Color.WHITE);
}
//第二个标签被点击
private void show_Fragment_letter() {
//开启事务,Fragment的切换是由事务控制的
FragmentTransaction transaction = getSupportFragmentManager().beginTransaction();
//判断Fragment是否为空
if (fragment_letter == null) {
fragment_letter = new Fragment_letter();
//添加Fragment到事务中
transaction.add(R.id.content_layout, fragment_letter);
}
//隐藏所有的Fragment
hideAllFragment(transaction);
//显示Fragment
transaction.show(fragment_letter);
//记录当前显示的Fragmnet
nowFragment = fragment_letter;
//提交事务
transaction.commit();
//设置底部标签的变化
iv_home.setBackgroundColor(Color.WHITE);
iv_letter.setBackgroundColor(Color.DKGRAY);
iv_my.setBackgroundColor(Color.WHITE);
}
//第三个标签被点击
private void show_Fragment_my() {
//开启事务,Fragment的切换是由事务控制的
FragmentTransaction transaction = getSupportFragmentManager().beginTransaction();
//判断Fragment是否为空
if (fragment_my == null) {
fragment_my = new Fragment_my();
//添加Fragment到事务中
transaction.add(R.id.content_layout, fragment_my);
}
//隐藏所有的Fragment
hideAllFragment(transaction);
//显示Fragment
transaction.show(fragment_my);
//记录当前显示的Fragmnet
nowFragment = fragment_my;
//提交事务
transaction.commit();
//设置底部标签的变化
iv_home.setBackgroundColor(Color.WHITE);
iv_letter.setBackgroundColor(Color.WHITE);
iv_my.setBackgroundColor(Color.DKGRAY);
}
//隐藏所有的Fragment
private void hideAllFragment(FragmentTransaction transaction){
if (fragment_home!=null){
transaction.hide(fragment_home);
}
if (fragment_letter!=null){
transaction.hide(fragment_letter);
}
if (fragment_my!=null){
transaction.hide(fragment_my);
}
}
public void onClick(View view) {
if (view.getId() == R.id.iv_home) {
//第一个标签被点击
show_Fragment_home();
} else if (view.getId() == R.id.iv_letter) {
//第二个标签被点击
show_Fragment_letter();
} else if (view.getId() == R.id.iv_my) {
//第三个标签被点击
show_Fragment_my();
}
}
}
ViewPager与Fragment的综合应用
Google 官方也建议我们使用Fragment来填充ViewPager,这样可以更加方便的生成每个Page以及管理每个Page的生命周期。
Google给我们提供了两个不同的Adapter,他们分别是:FragmentPageAdapter和FragmentStatePagerAdapter,它们是专程用来呈现Fragment页面的,这些 Fragment页面会一直保存在Fragment Manager中,以便用户可以随时取用。
如果要使用FragmentPagerAdapter类,需要重写getItem()和getCount()两个方法。
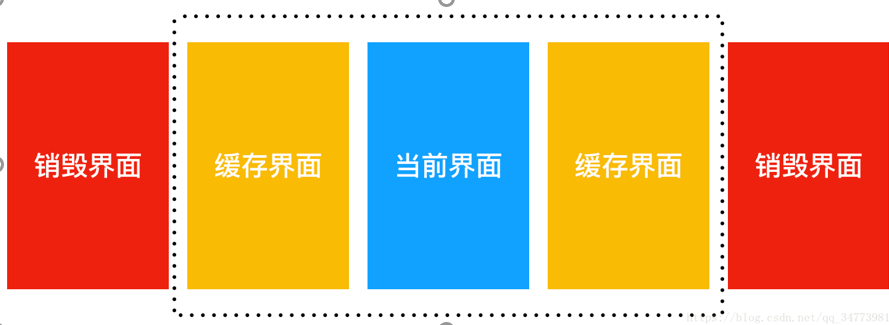
ViewPager还有一个比较重要的函数是:
- viewPager.setOffscreenPageLimit(int limit); 默认:1(limit的值代表着还要缓存当前Fragment左右各limit个Fragment,一共会创建2*limit+1个Fragment。)
Fragment适配器介绍
FragmentPageAdapter
- 用于实现Fragment的滑动效果
- 使用Fragment来填充ViewPager
- 适用于页面比较少的情况
- FragmentPagerAdapter消耗更多的内存
FragmentStatePagerAdapter
- 用于实现Fragment的滑动效果
- 使用Fragment来填充ViewPager
- 适用于页面比较多的情况
- FragmentStatePagerAdapter省内存
FragmentPagerAdapter适用于Fragment比较少的情况,它会把每一个Fragment保存在内存中,不用每次切换的时候,去保存现场,切换回来在重新创建,所以用户体验比较好。而对于Fragment比较多的情况,需要切换的时候销毁以前的Fragment以释放内存,就可以使用FragmentStatePagerAdapter
案例3:商城导航APP
- 在主布局文件中加入ViewPager切换区,底部导航区,分割线。(复用)
- 新建三个简单的布局文件,作为Fragment的View对象,并分别进行标识。(复用)
- 创建FragmentPagerAdapter适配器,提供ViewPager数据源。
- 在MainActivity.java里编写逻辑代码,实现UI及底部标签切换。
- 编写代码,以实现对底部导航功能。